Eurolining is a fairly popular finishing material in Russia. According to its technical characteristics, it is ideal for any residential premises. This material is a lining made of wood, which is produced according to European standards. Eurolining is more resistant to moisture and at the same time easy to install. Also note that this material is environmentally friendly and allows you to hide bumps on the walls without the use of putty and other materials. In addition, the lining makes the room visually larger. But how to fix the wall paneling to the wall and ceiling? Consider in our article today.
Material preparation
Before fixing the eurolining, you need to prepare the material. Although it is more resistant to moisture, it is still recommended to additionally protect the coating. To do this, it is treated with special means that prevent rot and mold development. After this treatment, the boards need to be dried and brought into the room where the decoration will be performed. What is it for? The lining is brought in to adapt the material. This will prevent shrinkage. Also, before fixing the lining in the bath, for example, you need to determine the type of lumber. It is divided into several groups:
- Premium It has an exceptionally flat surface.
- A. There may be up to two knots on each running meter.
- B. A pair of resin pockets and knots are allowed.
- C. It is a low quality material with numerous through holes.
For a bath, experts recommend the use of materials from group “A” or “Premium”.
Crate
Then the crate is performed. It will serve as a frame for attaching the lining. This crate is made of wooden battens. They are sent in accordance with the selected material packing option. With horizontal installation, a vertical arrangement of the rails and vice versa is required.
Using screws or screws, you need to tightly fix the boards to the wall. It is necessary to maintain a step of half a meter. When installing each board, the structure should be measured at the building level. Experts recommend leaving a gap for ventilation between the underside of the lining and the wall. This will extend the service life. Some maintain this gap for a heater. Mineral wool is usually used as the latter. The gap can be adjusted by the thickness of the board, which is used for the frame. Also, the crate itself must be treated with a protective antifungal agent. But this operation is not performed if steel profiles are used instead of rails. They are installed in the same way on self-tapping screws.
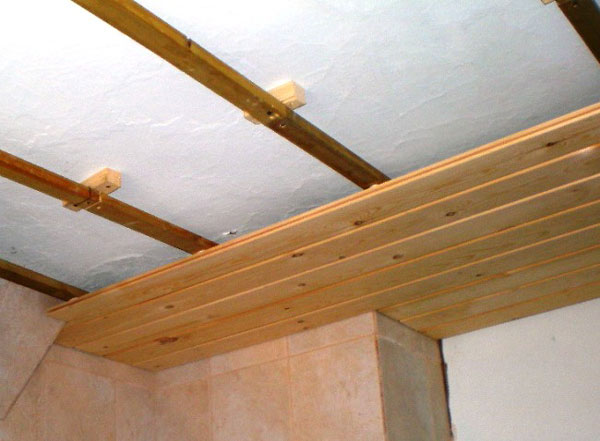
As for the method of decorating the ceiling, most often specialists use the frame method. There are special requirements for the ceiling. The roof must be strong, without cracks and tears. Otherwise, wood will rot. How to fix the lining to the ceiling? The technology for laying this material practically does not differ from the walls, except that the joint between the latter and the ceiling is closed with a baguette. So we give the design an aesthetic and complete look.
Types of Mounts
Before fixing the wall paneling to the wall in the bathhouse or in another room, you need to choose the method by which the material will be mounted to the crate. The lining itself looks like a plank. There is a groove on one side and a tenon on the other. The latter starts up in the groove of the next board. There are several mounting methods:
But no matter what method is used, it is worth working carefully so as not to damage the board. It is fragile and can crack when mounted. The lining must not be allowed to split.
Self-tapping
Typically, this technology is used in the case of horizontal installation. Sheathing begins at the top or bottom of the wall. But it is important that the starting surface is as flat as possible. For fastening, a drill is used, which makes a hole in the board on the side of the spike. The drill must have the same diameter as the self-tapping screw. As for the depth, just make a hole of 9 millimeters.
Installation is carried out according to the following scheme:
- The board is applied to the place where it needs to be fixed.
- The correct position of the element is checked by the building level.
- Using a drill, they drill through the spike of the hole into the crate.
- Screws are screwed along two edges.
- The remaining (central) fasteners are only half screwed in. So we will ensure an even landing of the lining. Next, all the screws are screwed all the way.
This is a simplified assembly method in which you can get a high-quality result.
Nuances
But there are some disadvantages of the method. First of all, you need to know how to work with self-tapping screws. With careless handling, they can easily split the lining. Also, this method of fastening is not used in the loggia, since the horizontal arrangement of the boards visually reduces the height of the already small room.
Staples
This method is more complex and requires experience with a tool such as a construction stapler. How to fix the euro lining in this case? Here you need to start work from the top. So the lining is applied to the crate and its position is measured by the building level. Adjust the board over it. Staples are driven into the spike at an angle of 45 degrees. If you use the stapler correctly, there will be no difficulties in fixing the boards. The bracket will go into the tree as much as possible.
Among the disadvantages of this method, it is necessary to note the need for a special tool (in this case, this is a stapler, which not everyone has and is quite expensive). But at the exit we get a secret mount. Outwardly, the coating will appear clean without any foreign objects.
Nails
How to fix the wall paneling to the wall with this method? To do this, use galvanized nails. The installation method is practically no different from the above. However, the use of nails requires a damper. It allows you to completely drown the hat. Without this tool, it will be difficult to drive the next board with a groove on the nailed spike.
What are the advantages of this method? Here you get the most secret mount. At the exit we get a beautiful wood surface. Sometimes nails are not installed in the spike, but on the board itself. But using this method is not recommended for living rooms. This can only be done in utility rooms and other utility rooms.
Apply dowel
How to fasten euro lining with a dowel? It is only necessary to start the installation from the floor. The dowel is a wooden product of a cylindrical shape. It is used to hide the technical details of the finish. Today, with a dowel, you can close the self-tapping screws that fix the lower plank from the floor. At the same time, the starting euro lining is mounted with the spike up. It is fastened with screws or brackets so that the visible fasteners are closed with the groove of the next lining. As for the topmost board, it is also fixed and covered with a dowel. The latter at the end of work is cut off or polished.
Among the disadvantages of this method, it is necessary to note the need for processing dowel after facing. This does not need to be done using other methods. Among the pluses is a flat surface without metallic inclusions. Also, experts say that this method is the most practical among others.
We use kleimers
This method is used for thin euro lining, as kleimers do not withstand heavy loads. They are an advanced steel bracket.
How is the installation in this case? Installation must begin from the ceiling. The first lining is attached using self-tapping screws. Again, it is important not to split the part when tightening with a screwdriver. Further, the board is closed with a dowel. The kleimers are on the back of the spike. To install the lining in the right direction, it is screwed to the wall. Then they drive a new one into the first board with a groove and repeat this process, screwing on the clamp.
What is the plus of this method? Experts note that using this method, you can save on the purchase of screws and nails. But you need to understand that this method is relevant only for lining with a small thickness and low weight. For high-strength models, this method is not suitable.
To summarize
So, we figured out how to fix the euro lining. As you can see, there are several ways and each is unique in its own way. However, the most popular among all is the method of mounting brackets.
How to fasten euro lining in the absence of a special tool? You can use galvanized nails. This is especially true if you need a secret method. When using a metal crate, experts advise fastening the boards with screws.