Starting to learn drawing, each student is faced with a new concept for himself - perspective. Perspective is the most effective way to recreate three-dimensional space on the plane of volume and depth. There are several ways to create the illusion of reality on a two-dimensional surface. The rules of linear and aerial perspective are most often used to represent space. Another common option is the angular perspective in the drawing. Each of these methods has its own characteristics.
The history of the frontal linear perspective
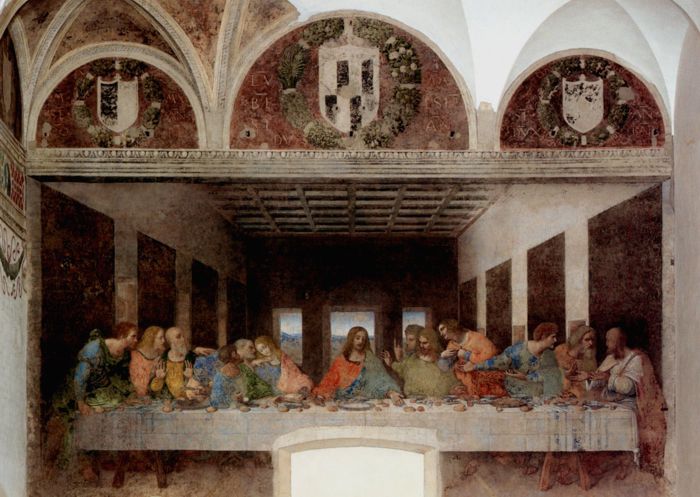
First, consider the concept of linear perspective. It is also called frontal. In the early Renaissance in 1420 in Florence, the great architect, engineer and sculptor Filippo Brunelleschi discovered this version of modeling three-dimensional space on a plane. By tradition, he went to Rome to study the ruins, and in order to more accurately sketch them, Brunelleschi created this system. He then presented his discovery in Florence.
After 15 years, in 1435, another representative of the Renaissance - Alberti - finally approved the theory of the architect and explained it to artists in his treatise "On Painting". But even before the discovery, artists were able to create realistic images using the laws of perspective intuitively. A linear and aerial perspective in painting existed, but was not described by theorists. Already at a subconscious level, it was obvious to the attentive master that if we continued the lines of the walls and floors of the house, they would certainly converge at some point. Back in the XIII century, the artist Duccio di Buoninsenia tried to convey volume and space in his works, going beyond the boundaries of the traditional school of painting. But the laws of linear and aerial perspectives themselves appeared later.
Concept of vanishing point and skyline
Let's look at a specific example of what a perspective is. If you look at the rails or other parallel straight lines into the distance, you will notice that they are gradually approaching and connecting at one point, which is located on a horizontal line where the sky converges with the earth. This place is called the horizon line. It is located at the eye level of the observer and is deployed in the distance in front. It is easiest to find it by following the direction in which the direct constructions in the figure are located. All of them will strive to converge in one place. The point at which all parallel lines are directed is called the point of convergence or point of view. Aerial and linear perspectives are similar in that they usually have a horizon line.

These two concepts are very important for understanding and correctly building lines in the drawing. There is one important rule - when moving away objects are visually reduced, and the distance between them is reduced. Using vanishing points, you can determine the height of an object at any distance from them. Due to the fact that they can be moved along the horizon, the frontal perspective can be quite diverse. With a central arrangement, the composition will be balanced and symmetrical. If you move the vanishing point, dynamics and an interesting asymmetry appear.
Ways to build a frontal linear perspective
The frontal linear perspective is also sometimes called scientific. For a very long time this option was considered the only possible one. It consists of three main elements:
- vanishing points;
- skyline
- perpendiculars.
We begin the consideration of constructing this type of perspective from the canvas. Let's mark a rectangle on it - it will be a work plane. Then you need to determine the location of the vanishing point. It can be in the center of the canvas or shifted to the side. Then mark the horizon line and start connecting the points on the sides of the rectangle with the vanishing point. You can depict a room by painting a plank floor, walls and windows. But the problem arises when you have to portray more complex objects, for example, a tile floor. Here you can not do without finding a measuring point.
Building complex objects
It will be intuitively clear that as you move away, objects become smaller and narrower, and horizontal lines will close together. The difficulty is to correctly determine how closely they will fit together and calculate the proportions. In his treatise "On Painting," Alberti proposes to create another point outside the picture at eye level, that is, on the horizon. Now through it and the lines on the "floor of the room" you can draw straight lines that show promising reductions. Through them, in turn, it will be possible to draw parallel lines and draw the objects we need. A perspective with two vanishing points is used to image objects from a position in the corner when two sides are visible, and is called angular. Their surfaces in the figure seem to be compressed, which creates the illusion of extension in space.
Object Scale
For the correct construction of objects and the correct transmission of the geometry of space, it is important to determine the scale in advance. For example, when depicting a room, its parameters in meters will be needed. For a meter, you can take any unit of measure, for example, 2 cm, and build objects based on it. A scale bar is drawn on the horizon line and the vertical parts of the frame. It is easy to draw construction lines through the vanishing point and the point on the ruler, since only two points are needed for a straight line. This makes it easier to create projections.
Determination of the measuring point
Then you need to find the measuring point. Before this, the location of the observer is determined. Let's say it is 6 meters from the opposite wall of the room. If the vanishing point is shifted, on the horizon line you need to set aside the ruler 6 + 1 meters in scale, moving from the part of the picture that is closer. If for 1 meter we took 2 cm, therefore, 14 cm is postponed. So we get the measuring point. Now, through it and serifs, you can draw straight lines to get points on the opposite side of the picture. Then, to create a grid, it remains only to connect them to the vanishing point, and then draw straight, parallel horizon lines through these points.
Inverse Linear Perspective
Another version of the perspective that was used in samples of Byzantine and Old Russian painting is called the inverse linear perspective. In this case, the objects are portrayed as if they are enlarging as they move away from the viewer. The created picture, in contrast to the aerial and linear perspective, has some features: the image in this case will have several horizons, points of view and some other nuances in the construction.
In the process of moving away from the observer’s eyes, the objects in the picture become wider in the opposite perspective, as if the vanishing point is located in the place of the beholder. In this case, an integral space is formed, which is oriented towards the observer. Unlike aerial and linear, the reverse perspective is most often used to create sacred images. It helps to embody the space of symbols, to make visible a spiritual connection, devoid of a concrete material form. She has a strict geometric description, in which she looks like a linear one. The reverse perspective arose back in the Middle Ages and was used to create icons, murals, mosaics. Interest in it returned again in the 20th century, when the legacy of the Middle Ages became popular again.
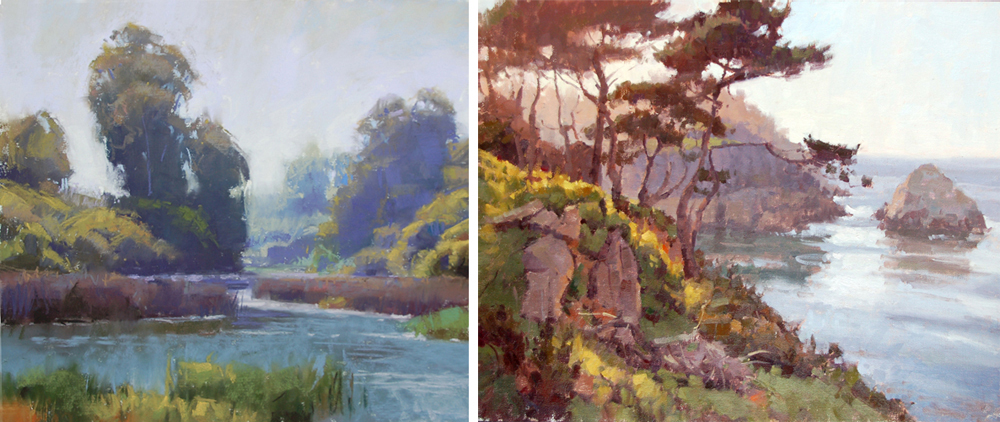
Aerial perspective
Along with the frontal linear perspective, there is the concept of aerial perspective. Its construction method consists in the fact that removed objects are depicted as if in a haze, behind a layer of air and with a minimum number of details. Close ones are more clear and bright. The more air - the more blurry the subject. The combination of two types of perspectives, linear and frontal, allows you to create paintings that are indistinguishable from real ones. If the picture shows additional impurities in the form of rain, sand or fog, the edges of distant images are practically erased. The first to describe this concept was the great artist Leonardo da Vinci. Compliance with the rules of linear and aerial perspective is very important for creating a realistic picture. But they are used in the creation of not all paintings
Landscape with linear and aerial perspective
When creating a sketch in the form of a landscape, the background plan is usually written unsaturated, using white with the addition of gray. Therefore, in the picture, the background is lighter and blurrier than the first. But much here depends on the goals of the artist. The rules of linear and aerial perspectives are not always used in a graphic sketch. For landscapes in red orange colors, for example, for a sunset or a plot using fire, the background is written using warm shades of red or yellow. In this case, the aerial and linear perspective complement each other. The overall tone of the background should be softer and brighter. It is generally recommended that the foreground be done in warm shades, and cold tones should be used for the background.
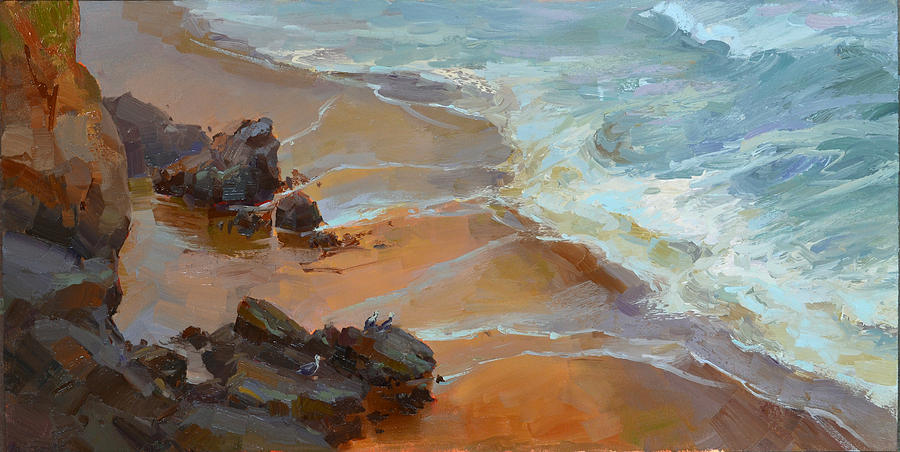
Aerial and linear perspectives have their own design laws. So, in the aerial perspective, there is a rule of detail: that which is far away, the human eye is not able to distinguish, so it appears blurred. A similar is the contour rule, according to which the outlines of distant objects should also not be too clear. Aerial and linear perspectives allow you to create canvases that accurately convey the volume of objects and imitate the illusion of additional reality.