Watering plants over a wide area, especially in dry weather, requires considerable time and effort, but not everyone has the opportunity to come to the site every day. Therefore, many summer residents are wondering: how to establish automatic watering in the greenhouse with their own hands?
Autowatering for different irrigation methods
Irrigation methods are divided into three main groups: sprinkling, drip irrigation and subsoil. Watering on the soil with a watering can does not apply to these options. A method such as subsoil irrigation, which can be carried out using hoses or pipes with pore openings, is ideal for irrigating hedges and perennials.
Micro irrigation or drip irrigation is a system convenient for providing the necessary moisture to trees, bushes, pendants. Drip irrigation is the most popular watering method for gardeners, as it makes it possible to direct moisture directly to the roots of plants. The method is good for growing tomatoes, cucumbers, eggplant, but does not replace full watering. Sprinkling is an ideal way to irrigate flower beds or lawns. You can set up automatic watering in the greenhouse with your own hands for any option.
Plastic sprinklers
Autowatering especially helps with irregular water supply to the site or at strictly defined hours. In this case, it is necessary to water a lot, but it is undesirable from the hose, since a strong pressure of water will wash the ground at the roots. The standard irrigation system is the pump, hoses and sprinklers required for irrigation. Sprayers or sprinklers can be made from improvised material - simple plastic bottles. Bottles with a capacity of 2 to 5 liters are suitable, in which holes of various configurations are made, depending on the type of sprayer. Insert a hose into the neck of the bottle or hole in the cap. Can be glued to the holes of the halves of the cases from plastic handles.
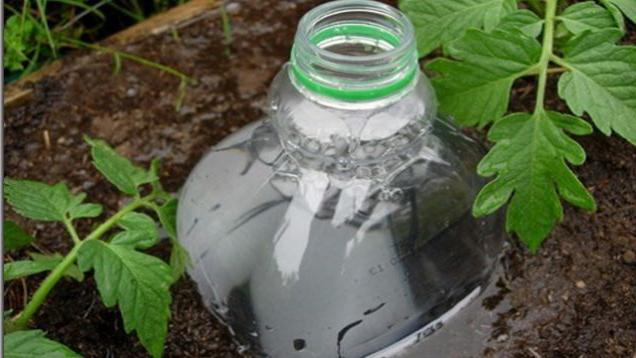
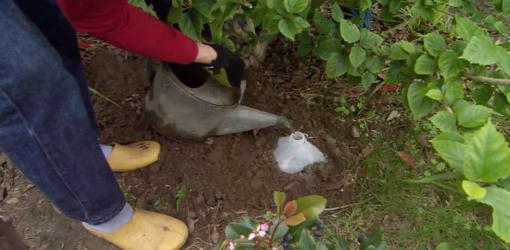
Drip irrigation plastic bottles
Do-it- yourself drip irrigation in the greenhouse can also be adjusted in several ways using 1.5- and 2-liter plastic bottles.
- In the walls of the bottle (not reaching 3 cm to the bottom), it is necessary to pierce several rows of holes in a checkerboard pattern. The number of holes depends on the type of soil and water flow. The bottle should be buried between the plants (preferably when they are planted in the soil) with the neck up to a depth of 15 cm. Watering is done through the neck, and the water that is manually filled in or from the hose into the bottle through the holes will go to the roots.
- In the second method, we prepare the bottle in a similar way, but we make holes near the neck. The bottle with the cut bottom should be buried with its neck down, having previously screwed the cap. To prevent the evaporation of water, we return the cut bottom to its place, turning it over. In this case, filling the bottle with water is easier.
- Do-it-yourself autowatering in the greenhouse can be made by hanging plastic bottles over the wicker near the plants so as not to erode the ground. Then the water coming from the hose will also warm up in the sun. Only in this case, holes are made in the lid or near the neck. You can adjust the volume of water poured out without piercing the holes by unscrewing the cover. Small holes of 1-1.5 mm will prevent the water from leaving too quickly.
- Moisture-loving plants with large breaks between irrigation will help out plastic bottles of 5 liters. Holes need to be pierced on one side of the bottle from the bottom to the neck. On the wall in the opposite side, cut a window for pouring water. The bottle is instilled in a horizontal position with the holes down and the window up.
Do-it-yourself autowatering. Scheme
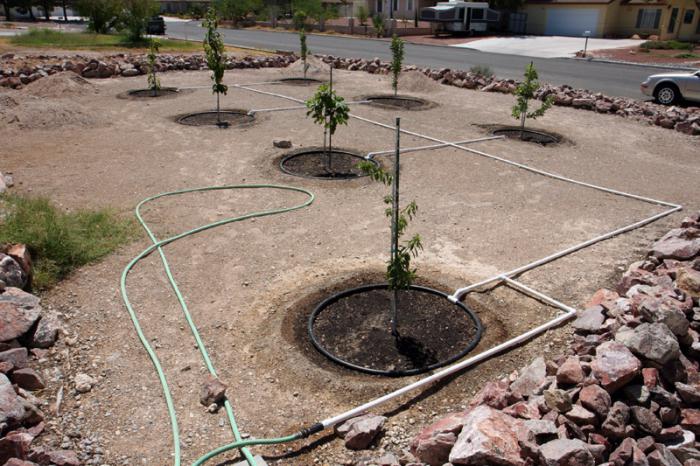
The drip irrigation scheme using plastic bottles can consist of several basic elements, it all depends on the volume of the greenhouse and the number of plants.
- A barrel or tank of water, preferably black.
- Crane.
- Float chamber.
- Connecting hoses (located underground or on the surface).
- Dispensers of plastic bottles located underground between plants.
Water automatically moves from the water supply system or from the barrel to the float chamber, then it flows through hoses into plastic bottles, providing automatic watering for the greenhouse. With your own hands, the scheme of such an irrigation system is reproduced quite quickly. Instead of pipette dispensers, you can use a drinker from a plastic bottle on the surface and a dispenser canister buried under the ground with holes.
How to install an automatic watering system?
- Firstly, it will be necessary to draw up a site plan with beds and the number of plants for which drip self-irrigation is required with their own hands from plastic bottles. The plan must indicate the location of pipes, hoses, droppers and valves. A garden in an area with a slope will require horizontal placement of pipes and inclined drip hoses. The pipe connection points marked on the plan will allow you to calculate the number of plugs, tees, taps and connectors.
- Secondly, the water supply system is thought out. The lack of water supply can be replaced by a tank installed at a height of up to two meters. For the main water supply, pipes made of plastic are more suitable, through which water can be supplied with any concentration of fertilizers. The type and brand of equipment required will affect the overall cost of the irrigation system. It is advisable to use filters for fine water purification so that droppers and drip hoses do not clog. Filters will need to be cleaned after a certain period of time.
- Thirdly, choose a method of installing pipes. The most economical is laying in the ground. If necessary, you can hang them on supports, but it is advisable to take opaque pipes and hoses so that the water does not bloom. Buried pipelines should have thick walls. Installation is made after all beds are formed.
- Self-powered electric controllers will help to establish a trouble-free autowatering with your own hands in a greenhouse or on a site.
- The system must be flushed before use. Why remove the end caps, let water in until clean water comes out.
Autowatering with a drive and plastic bottles
Do-it-yourself auto-irrigation in the greenhouse is easy to establish based on a simple and affordable scheme.
- Water tank with tap.
- Drive made of canister mounted at an angle.
- Funnel, which can serve as the same canister or plastic bottle.
- The base where the funnel and drive are fixed.
- Stops for the drive on the base.
- Bulk pipe with holes.
- Counterweight.
5 liter canisters are ideally suited as material for the future funnel and storage. To do this, crop their upper parts at the right angle. The capacity of the drive is also set at an angle, attached to a wooden plank, at the other end we mount a counterweight. The stops and funnel are fixed on the base. The drive will rotate on the axis from one stop to another. The funnel opening is connected to the irrigation pipe.
Auto watering from hoses
Do-it-yourself autowatering for the greenhouse can be made in another way. The circuit will consist of a pump and hoses. Automation must turn on the pump at the same time. Through the rubber hose, it is necessary to make through holes with different hot angles through the holes through 30-35 cm. A hose with holes is laid through the greenhouse and connected to the pump. To prevent the holes from clogging, you can extend the hose along the boards or through the film.
Watering Rules
Do-it-yourself autowatering in a greenhouse, the photos and diagrams of which are easy to find, saves a decent amount of time. Using an automatic irrigation system, it is important to consider irrigation rules for different types of plants.
- Abundant watering (1, 2 times a day) is preferable to frequent, but insignificant, which is especially harmful to plants in dry weather. On average, 10 liters of water leaving the irrigation system will moisten the soil per 1 m 2 to a depth of 10 cm.The main volume of the roots is located at a depth of 20-25 cm, which means that 25 liters per 1 m 2 are required to wet the soil to the roots.
- Irrigation rates are determined depending on soil composition. For example, light and sandy soils need more frequent watering than clay, and less abundant. Experienced gardeners always take into account the depth of the roots.
- To get a good harvest, vegetables are watered at a certain time, taking into account the norms. The period of intensive growth until mid-summer should be accompanied by abundant watering. Plant development during this period will depend on the availability of water. During the ripening period, excess moisture, on the contrary, is harmful.
- Water temperature is also important, it is recommended 10-12 degrees, but not lower. The sharp contrast between the temperatures of the upper layer of soil and water is detrimental to plants. Ice water will weaken the seedlings, causing a shock in them, so it is better not to water directly from the well or well, but use water from storage tanks.
- To create pressure, the tank is placed above the ground at a height of 3 meters. If there is not enough pressure to use sprinklers, you can install a pump. Water discharged from the sprinklers under pressure has time to warm up until it reaches the surface of the earth.
- If the soil looks wet, it is difficult to determine if watering is required. A simple method will help: dig a hole in the bed up to 30 cm deep, if the soil at this depth is slightly moistened or dried, then you need to water it.
Conclusion
Setting up automatic watering in a greenhouse with your own hands from plastic bottles is quite simple. The advantage of this method of irrigation is sufficient hydration of plants with less water consumption. Dry soil surface under radical irrigation will prevent the development of weeds, rot and fungi. In hot weather, a crust does not form and you do not have to often loosen the soil.