A microscope is used in educational institutions, medicine and scientific institutions. It is used for a detailed examination of very small objects that are invisible to ordinary eyesight.
If you want to learn how to draw this difficult device correctly, you will first need to get information about the methods and nuances of such work. From this article you will receive detailed information on how to draw a microscope with a pencil in an affordable way. Using the following step-by-step guide, you can get an accurate picture of an optical device - a microscope.
How to draw a microscope with a pencil (in stages)
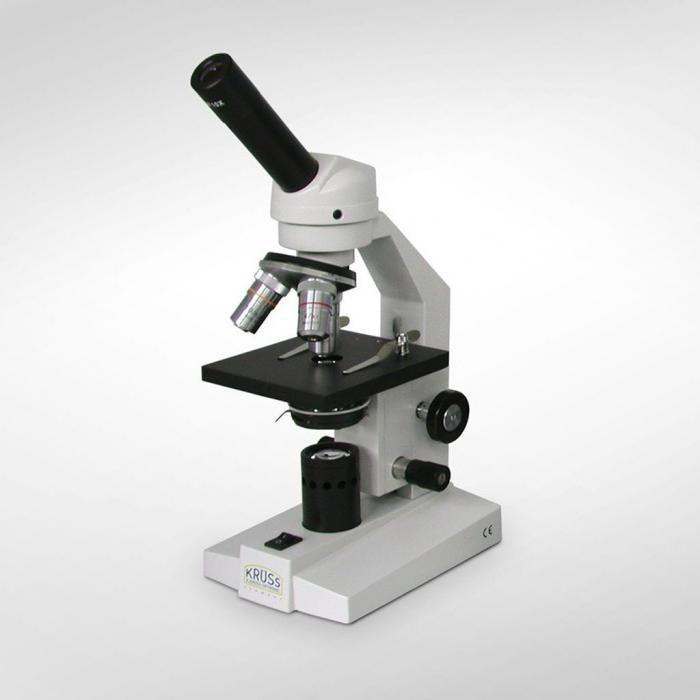
- Step 1. First draw a telescope or tube designed to observe the subject. There are varieties with one and two tubes. Draw a rectangle slightly rounded at the end, with a slight extension. The tube should be inserted into the base, which is attached to the disk with a tripod below
- Step 2. Draw a lens disc. The resulting oval in the figure is a circle in reality, with an elongated front part. Three to four lenses are inserted in the disk. They contain lenses of varying magnification (ability). It is the lenses that give the necessary increase in subject. Draw a cylindrical lens, slightly narrowing to the end. This is the place where the lenses are located
- Step 3. Draw the back of the microscope from the base of the tube. This is the so-called leg that connects the platform and the tube of the microscope. Draw in straight lines to convey the distinctive outline of the legs
- Step 4. Draw a stage with holders. These are small plates that are fixed with screws. There are usually two of them and they hold the slides. They host an object for study. A screw is visible in the bottom section of the table. Needed to remove and get closer to the table
- Step 5. Draw a blank - the place where the microscope leg should be inserted. This figure looks like a box. On both sides, apply large screws to lower and raise the legs of the optical instrument
- Step 6. Draw the platform (base) of the device, the place on which it stands and fastens. Based on depict the backlight - a small flashlight or lamp
- Step 7. On both sides of the ledge with backlight draw the base of the device with legs below. On the side, in the rectangle, there is a button for turning off and on the backlight
- Step 8. Paint on the screws and backlight. It is in this way that it will be possible to convey their ribbed texture.
- Step 9. Remove any excess auxiliary lines. If desired, color the resulting black and white drawing. Select the light and dark areas of the sketch.
Read the step-by-step instructions carefully in order to understand how to draw a microscope simply and well.
Necessary tools and materials
Before you draw a microscope, you will need to prepare stationery and auxiliary tools, neo
Required for work:
- White sheet of paper.
- Stylus pencil.
- Eraser.
- Image or photograph of a microscope.
- Several colored pencils in dark shades.
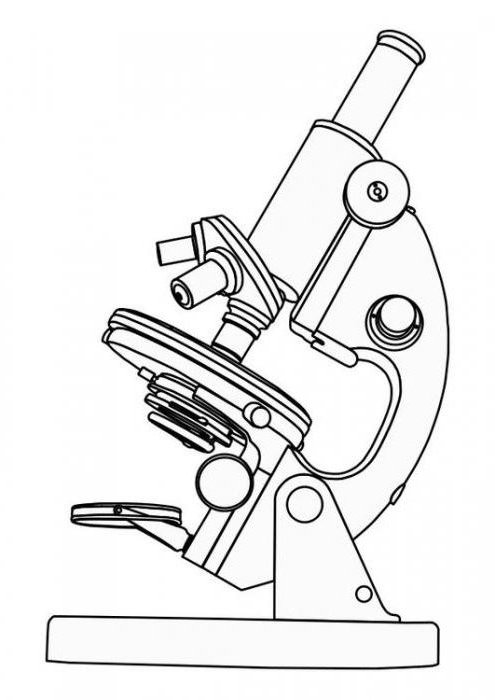
How to draw a light microscope
- Prepare a sample - image or photograph of a light microscope.
- Start by drawing an eyepiece. Draw it in the form of an oval (side view). Draw another oval inside it, slightly smaller. This is a hole with a lens, with the help of which a studied object is examined.
- The eyepiece is located at the end of the tube. Draw it in two parallel lines, and outline the opposite end with an arc.
- A tube enters the prism, it is located in the casing. For a prism image, draw a right triangle below the arc. To give volume, draw two lines diagonally to the right and up. Interrupt the top image of the tube, and connect the lines together.
- Depict the lens as a small cylinder. Under it, draw an oval shaped stand.
6. At the top, draw a small rectangular object table. If you wish, you can depict a side mirror and three plug-in lenses on a swivel turret (the place where the lens or lenses are mounted).
Controversial Facts
According to historians, the creator of the microscope is considered Anthony Van Levenguk. For many years, until the middle of the XVIII century, his invention was popular. However, it is believed that before Levenguk, in 1661, Robert Hook improved the Huygens sample - he added an additional lens to the prototype of the microscope. This is exactly what solved the issue of image sharpness. We do not know reliably who invented the microscope. However, we can fully appreciate the role of the invention for the whole world as a whole.