Among a large number of gluteal muscle exercises, trainers often undeservedly forget such an exercise as the gluteal bridge. And completely in vain, as practice shows. It is very effective because it specifically targets the gluteal muscles, helping to strengthen them.
What other options are there?
There is a large number of exercises, representing variations in the execution of the gluteal bridge with special instruments and shells, as well as without additional devices.
What shells, devices, appliances will help improve the technique of the exercise? Dumbbells, barbell, bench or chair are the three main assistants for those who want to do fitness. Well, the coach, of course, if you are not engaged in an independent mode, is also very important. More precisely, his qualifications.
The exercise "buttock bridge" directly loads our pelvis, which makes it possible to fully work out all the muscles of the buttocks, and as a result, the priest is pumped up perfectly. But many girls want this exactly.
But in any case, the so-called theory should be disassembled, that is, to figure out how to correctly make the gluteal bridge in all its variants.
Option No. 1. Standard bridge on the bench without additional devices
- The pelvis rises as high as possible above the floor. It is desirable that the buttocks are at a level higher than the head and shoulders. It is necessary to draw in the stomach and ass.
- Legs are as straight as possible. With hands, the situation is similar. Bending your elbows is wrong.
- Watch your back. It should be slightly curved. But in order not to damage the spine, be sure to pull the buttocks into you (see point No. 1).
- Another tip you shouldn’t dismiss. Pay attention to how you breathe. Inhalations and exhalations are as deep as possible. You should feel how your stomach is trying to inflate, then become drawn into yourself. If so, then the diaphragm is working. This is exactly what we need. But do not do anything specifically with effort. In terms of breathing, of course. Your inhalations and exhalations should gradually become deeper in themselves, if you do everything right.
Such items will need to be kept in mind when sports equipment, instruments and appliances are added.
Option No. 2. Leg weights
In a more advanced version, the exercise "buttock bridge" can be performed with weighting. This is a big plus for your classes, if the goal of your training is to pump up your ass. Weighting agents contribute to the fact that the muscles contract more qualitatively, and the effect is manifested faster. But at first, this option may seem complicated. Weighting agents are not attached to the lower leg, but to the hips.
Thus, you act similarly to option one. You draw in a basin, lift it above the floor, straighten your arms and legs, stretch your spine and calm your breathing. Over time, the exercise will be given easier and easier. As you know, practice is important here.
Option number 3. Feet are placed on a bench or chair
Please note: unlike the previous options, the position of the legs changes here. If your legs were on the floor before, now you place the part below the knees on a chair, not on the floor. The upper body is identical to the first and second variant - on the floor. It’s just that your feet do not fall to the floor, but are located on a chair or bench.
Choose the bench height that best suits your parameters. Legs should not bulge much or vice versa. We repeat all that has already been. Namely: arms are straightened, legs are similar. We pull the pelvis into ourselves, straightening our back. And breathe, breathe. Deep. It is important to fully saturate the body with oxygen.
Option number 4. The inverse of the third option
The upper body, or rather, the head and shoulders are located on the bench. This is a slightly modified type of exercise "buttock bridge", the technique of which requires some effort. Be careful not to damage your neck. Check that the head and shoulders are fully in contact with the bench. Feet are located on the floor, find balance. Then we repeat the cycle again: retract the buttocks, raise them as much as possible above the floor, keep the back straight. Retract the position of the buttocks all the time so as not to damage the spine. Otherwise, big problems will arise. Perform the exercise calmly and at a slow pace.
Option number 5. Add dumbbells
The gluteal bridge with dumbbells is as follows. Dumbbells are taken in hands. It’s better to start with a small weight, to start a kilogram or two will be quite enough.
We bend our elbows, we press them to the chest or raise them up. Legs on the floor, pelvic muscles and back are straightened, buttocks must be in the retracted position. You can modify the exercise by entering according to option 3. That is, put your feet not on the floor, but place them on a bench or chair. But this method of doing exercises is for more advanced ones. Start small. Remember to breathe, this is the most important thing in any workout.
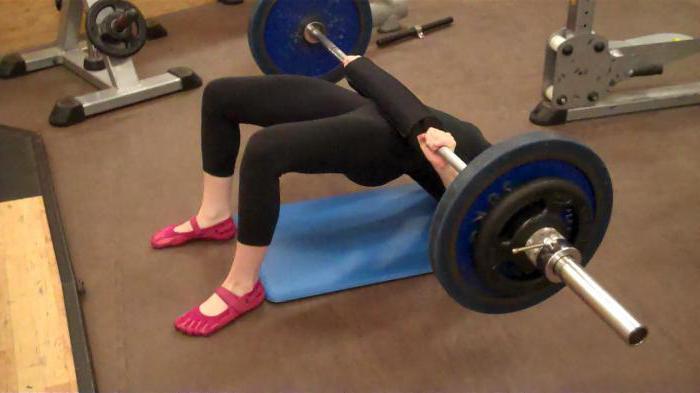
Option number 6. What do we know about the bar?
This is the most difficult version of the gluteal bridge exercise. His technique should be perfected quite well, because when doing bench presses with a barbell, it is easy to get injured. Initially, the very first version of the exercise is a standard gluteal bridge, supplemented by the fact that a bar is pressed to the stomach, which hold hands. Thus, the arms are straightened, but hold the load firmly. Next, we work according to the same scheme, or rather: pull the buttocks, legs firmly pressed to the floor, the pelvis rises with the body. Do not overdo it. At stake is the health of your back. To make it easier for the spine to cope with the load, clamp the buttocks and distribute the weight of the body and the bar evenly.
Another method of doing the exercise is to improve option number 3, described above. Head, shoulders lean on a bench. Feet pressed to the floor. We change the pose - we lower the head and shoulders onto the bench, but raise the pelvis up. Since this exercise is quite heavy, it must be performed at a measured, slow pace. Combine the amplitude of the gluteal bridge exercise with the breath amplitude. When you inhale, you relax and lower; when you exhale, you begin to maintain a position at the highest point.
Talk about approaches
The simpler the option, the more approaches should be followed. The first option - 30 times in 2 sets. Further, as the variant becomes more complicated, the number of times in one approach decreases. Option six more than 15 times, especially for beginners, should not be performed. Otherwise, then you suddenly find that you cannot move when you try to get out of bed the next morning. Everything is done gradually. The load and quantity are gradually increasing. Start with 1 or 5 options. Then move on to more complex ones.
Efficiency. How to achieve it?
How to make a gluteal bridge to maximize the effect? Slowly feeling every muscle. This is not an aerobic exercise, so you should not chase the speed of execution. You take the initial posture and decide which instruments you will use to exercise - dumbbells, barbells, weights on your hips, or something else.
In the general case, the positions of the legs are 2 options, let’s say, the positions of the upper body can also be 2. The lower and upper body can be located on the floor or on a bench. If one part of the body is on the bench, then the second is necessarily on the floor. This is necessary for stability and balance. At the same time, the lower and upper parts of the body can also be located on the floor calmly. But it is less effective. Nevertheless, for beginners such a gluteal bridge is just right. Now, inhale, exhale. Once again inhale, exhale. Then a deep breath is taken, a calm exhalation is taken, and a position with a raised pelvis is taken. Slowly reach the top point, stay in this position for several seconds, the more the better. The breath is calm. Then go down on the next breath.
What else do you need to know about training?
Before performing any set of exercises, pay attention to the fact that it is necessary to warm up the muscles before classes. Before the main workout, a warm-up is performed, only after that you start something else. Otherwise, the risk of injury will increase, and the lesson itself will occur with less efficiency. These are usually simple aerobic exercises.
You should also correctly complete the training. This will help you reduce muscle pain in the future. Various stretching and balance exercises are used here. Perform them at a slow pace, gradually lowering the pulse after the main workout. The fewer sudden jumps and transitions, the less stress for the body.