Assembling a cake is not the most difficult process in cooking. This is especially simple if it is single-tier. There are tricks here that will help the dessert not to "swim". However, even experienced confectioners sometimes can not cope with multi-storey buildings. But even in the case of a decision to assemble a multi-tiered heavy cake on their own, there is a technique that will keep this confectionery product and prevent it from moving out or swelling. Consider the options for assembling a cake with one tier and several.
Tools for working with biscuit single-tiered dessert
In order to assemble the cake, you need to stock up on some set of culinary tools. Parts of them may not be at hand of an amateur pastry chef, but they are easy to replace. So, in order to collect a simple dessert, you must have these items:
- pastry spatulas;
- notch knife;
- a spoon for ice cream;
- cardboard backing;
- Rotary table;
- non-slip mat.
The spatula can be replaced with a wide knife. To do this, you will need to distribute the cream using the blunt edge of the blade. Instead of an ice cream spoon, you can use a pastry bag. Instead of a non-slip rug, we take a reusable napkin. Even a knife can be used not with a serrated blade, but an ordinary one, but cutting a biscuit will be a little more difficult. Instead of a turntable, you’ll have to revolve around the cake yourself, so it’s better to buy this device on occasion.
Assembly of a single-tiered cake
A little tip before starting the cake assembly: the biscuit must first be cooled and put in the refrigerator for at least 2 hours. Before this, you need to wrap it with cling film or put it in a plastic bag. In this case, it will be saturated with moisture and cool. This action will help to kill two birds with one stone: firstly, the cakes will become tastier, and secondly, they will be more stable.
As for the cream, in order for the cake not to "go", it must be dense (butter, creamy or as in the Swiss meringue).
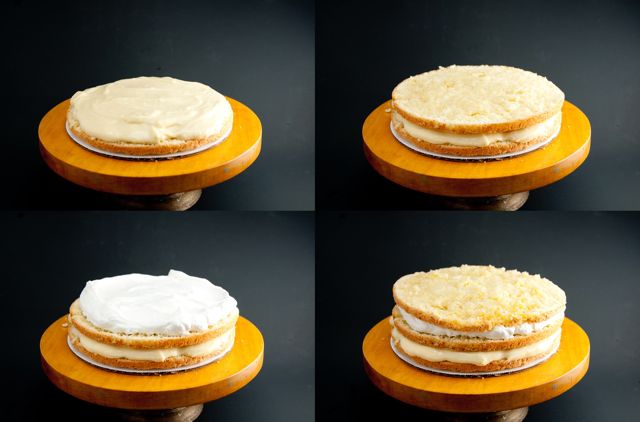
We proceed to the assembly of the cake:
- The biscuit base needs to be cut. Remove the crown completely. In the work, it is not useful, but it can later be used for decoration.
- The biscuit itself needs to be cut into two or more pieces along, depending on how high it is baked.
- The cream is laid out portionwise. But before that, it is necessary to put a napkin or a special substrate on the rotary table, and cardboard on it. This substrate must be greased with a cream so that the lower cake is, firstly, well saturated, and secondly, glides less on the surface.
- The cake, which was the bottom of the biscuit, must be put aside. He will go to the crown of the cake.
- We spread the remaining parts in this way: put a part of the biscuit, top with a spoon of cream, level it with a spatula. The tool must be removed from the cake carefully from the edge so as not to break the biscuit.
- At the end of the process, put the bottom upside down with the uncircumcised side up. This will help make the top of your head perfectly flat. After that, the cake should be put in the refrigerator for a couple of hours, and then proceed to decorate it.
Assembly of a single-tier cake in the form of
Special devices for work will not be needed. The only thing is the acetate tape, which will need to lay out the form. The product is ultimately very smooth and stable. So, let's proceed to the assembly of biscuit cake.
We lay out the shape of the same diameter as the cakes with an acetate tape and put the cakes and cream alternately. Important: cakes must be baked sufficiently thin, since in this case it is necessary to make all layers of approximately the same thickness. So the delicacy will be more sustainable.
Sponge cakes for sealing and stability must be left under the press in case of assembly in the mold. This is true for cream cakes and treats with one mousse layer. The former in this case remain under pressure for 4 hours, and the latter for 6 hours. The weight is about 400-500 g. Purely mousse cakes of the press do not require.
When the cake settles, the mold is removed, and the tape is separated using a slightly heated knife.
Such a dessert is best decorated with mastic overlaid on ganache.
Assembly of two or more tiers: inventory
To assemble a cake from several tiers, you will need to stock up on the following tools and additional items:
- hob;
- cake stand;
- two different containers;
- long wooden skewers;
- plastic straws for cocktails;
- a large spoon;
- cling film;
- pastry bag or file.
Note: it is advisable to make the cakes as light as possible so that the cake does not sag. Making a different type of dough is a good option: make the lower tier more dense and heavy, and the upper tier - lighter.
Bunk Cake Assembly
This is an easier process than making a monumental dessert for more than a dozen kilograms, but still requires a reverent attitude. To prevent the cake from sagging and warping, it is necessary to strengthen its base.
Collect the cake should be already when the tiers are covered with mastic. So, one skewer will need to be stuck in the cake in order to measure its depth and cut it to this length. The cocktail tube must also be cut to the same length and insert the stick into the straw. In the middle we stick this design into this tier. We do the same 5-6 times more, placing the sticks with tubes around the center as if in the form of a flower.
Now you can simply put the second tiled with mastic on top. The cake is not deformed. Further it remains only to decorate it to the end.
Assembly of a multi-tiered cake
The principle of strengthening the cake from more than two tiers is about the same as the smaller counterpart. But there are secrets here:
- Cakes should be covered with mastic and refrigerated. And only then proceed with the assembly of the cake.
- One skewer is needed here. All tiers of a festive treat will be planted on it. You will also need straws and white chocolate.
- Before starting the assembly, the skewer must be wrapped with cling film on top. We stick a stick in the middle, and around at a distance of about 3 cm we make holes with tubes. The straws will need to be removed. They, like in a two-tier cake, need to be cut to fit the tier height.
- Next, the white chocolate is melted and poured into the holes made by the tubes with a sachet or bag. Then the tubes need to be returned to where the chocolate is poured.
- The second, third and subsequent tiers, except for the upper one, are mounted on a skewer and on each other in the same way. And just put the last one on top. It is important to ensure that the skewer does not pierce it through.
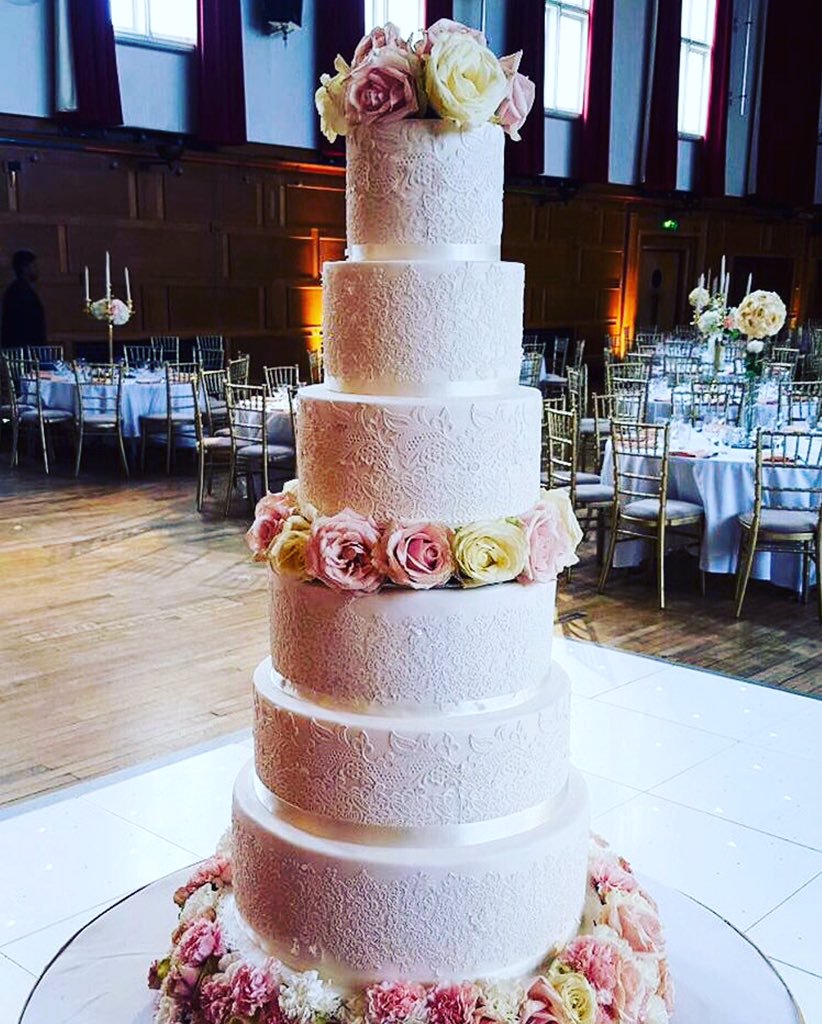
Now this beauty can only be fully decorated and not dropped at the moment of removal to guests.
Assembling a cake with cream from several tiers is also possible, but the product will turn out to be more fragile. Cream decorate dessert is necessary after the tiers are interconnected.
Here are so many ways to make cakes! And this is not the limit. But in any case, if you follow the instructions given, your treat will not fall apart and will be the pride and main decoration of any holiday!