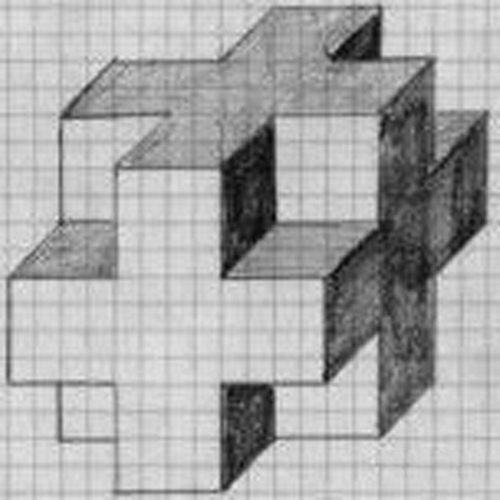
There are different levels of difficulty for the drawings. You can depict a pencil cross on a landscape sheet with a special technique of hatching and shading. If beginners do not know how to do this, then in this case a notebook sheet is suitable, on which it is easy to create a volumetric cross pattern using points and cells. No more than 7 minutes will be spent on work, but the result will certainly please.
Tools and materials
For such art, you need a minimum of accessories. Each student probably has this inventory. The list of necessary things:
- notebook sheet of paper in a cage;
- simple pencils or ballpoint pens with black and blue paste;
- ruler.
If you use a pen, then the incorrectly drawn line can no longer be erased. Therefore, a volumetric cross in the cells is worked out with a pencil, and then with a pen.
The line is used for drawing straight lines, because by hand they turn out to be curved, which in turn spoils the picture.
Instead of notebook paper they use an A4 album sheet. It makes markings in a cell and creates the desired image. However, much more time will be spent. In addition, the mesh must be erased so that there are no grooves or unfinished lines.
Dot arrangement
From the first time it will not be clear where to draw the lines, so it’s better to place auxiliary points, which will be further connected by dashes. How to draw a volume cross according to the instructions:
- The length of the cross is 24 cells, and the width is 18 pcs., Can be made wider. But this is without those elements that will be added on the side and top to create volume.
- 3-4 cells retreat from the top of the leaf. Below put 2 points parallel to each other.
- 24 squares retreat vertically and put similar dots.
- Stepping back from the top by 8 cells, indicate the horizontal bar. 9 squares go from the middle in each direction.
- Now, cruciform blocks are made at the edges of the object. The width and height of the fragment is 6 * 6 cells. It is necessary to retreat 2 squares down from the upper end, then 2 pieces to the sides. and put a point. That is, the figure will consist of small crosses.
Points must be placed carefully so that there is no curvature in the process of connecting the dashes.
The development of the front of the object
Having done this stage of work, it will become easier to attach the following details. Have to prepare a ruler and pen. How to draw a volumetric cross on the cells, using the right lessons:
- At the established points, lines are drawn that form a figure. It is necessary not to confuse the direction of the dashes by auxiliary pointers, then the object will be flat.
- They work with a ruler. The tool is applied vertically to the points, a line is drawn in 2 cells, the bar is turned horizontally and a crossbar is drawn. Then the inventory is again applied so as to draw the extreme side of the cross. Thus, the outlines are made. In total, there are 4 cruciform blocks in the height of the figure, which must be drawn, but without crossing the lines inside.
- The horizontal consists of 3 blocks. Mark out similar contours of the subject. You also need to remember that from the right edge leave an empty space the size of several cells to accommodate the added elements.
This stage of work takes no more than 1 minute.
Volume creation
This step of drawing an object is considered the most difficult. It is necessary to correctly place the points and work out the blocks at an angle. How to draw a 3D volume cross:
- The 3 upper sides of the figure have 2 blocks. Four cells retreat vertically from the top of the item. The line is turned over, horizontally go to the right side by 3 squares.
- They put a point, at the same time they plan another one, stepping back a little to the side. Then, diagonally square, and to the right horizontally draw a dash. Again, a line is drawn diagonally through the cell, outlining the outline completely.
- To this detail on the side they draw a block, which should consist of 4 vertical and 4 diagonal bars. The drawn elements inside are connected by lines to form a volume.
- At the bottom of the main cross on the right side add 1 block, making it in a similar pattern. Then, another cross-shaped fragment is worked out a little higher, which will connect in the crossbar of the object.
- All the details inside are closed by lines, but symmetry should be observed so that the thickness is the same - 2 cells.
After going through this difficult stage, it remains to correctly decorate the picture.
Outside coloring
The front sides of the figure should be shaded with a ballpoint pen with blue paste. If you do not violate this technique, then the picture will turn out more beautiful. Volume cross step by step:
- A short hatch is applied from the top to the bottom of the front of the object. The front part is painted with dashes vertically to the direction of the main contour.
- Then the remaining voids between the strokes overlap with horizontal dashes, placing them as densely as possible.
- Fill is applied layer by layer in the same way, so that the areas of the white sheet are completely hidden.
- The side fragments are painted in a slightly different way. The lines of the cross-shaped blocks are located diagonally, so they must be hatched in the same way. Then the color will lie correctly, and the picture will become more realistic.
If you want to make highlights, then use a rubber eraser. The grater is divided into blue and red, dark white and gray-blue. It is the darkened side that you need to slightly erase 1 edge of the object, creating light on the figure.
Shading inside a shape
After working out the light sections of the subject, they start hatching the shadows. These are the places that are located between the front sides of the blocks. The darkening of the volume cross is carried out in several stages:
- Work begins on top. A pen with black paste imposes a hatch in the direction of the contour lines. If they are drawn vertically, then the dashes have the same. Too much pressure on the pen or pencil is not necessary, otherwise the fill will turn out uneven.
- Translucent white areas are completely painted over. This will help layering short lines.
- You cannot cast a shadow in one tone. At different places should be partial shade. Choose the angle of incidence of light. That is, those details that are closer to the source will be lighter. A rubber eraser will also help.
How and where the chiaroscuro will be located, only the creator of this drawing will decide.
Additional details to enhance the effect
To make the picture even more beautiful, you can draw ornaments and create a shadow from the object. You can decorate a volume cross like this:
- Along the perimeter of the figures draw an ornament from plants. They also hatch and apply chiaroscuro.
- The falling shadow of the cross will strengthen realism. It should repeat the shape of the figure and overlap at an angle to the right or left side.
Shading can be slightly shaded with a piece of paper. With enough light strokes to wipe the painted spots, and the lines will be smoothed out a little.