The question of how to draw an umbrella may arise in front of people of any age. After all, the ability to depict objects is always useful in life.
Practical application of umbrella drawing skills for wall decoration
Today, many refuse to wallpaper the walls. Indeed, often this way of decorating the premises is fraught with the appearance of insects in the home. Yes, and repairs have to be done more often than in rooms where the walls are covered with whitewash.
But in the nursery, for example, just whitewashing the walls will be boring. You can easily make the design fun and vibrant if you know how to draw an umbrella. It is only necessary to make a stencil out of cardboard. By adding gouache to whitewash, you can get any colors and shades. Here it will turn out wonderful, not similar to other room for the kid!
Drawing lessons for the little ones
In kindergarten, you can also hold a lesson in which to show the children how to draw an umbrella. The best pattern is recommended to use for the manufacture of plates on lockers in the locker room. An umbrella is simply glued onto a cardboard circle and covered with varnish or liquid glass - ordinary stationery glue.
Kids can use their skills to design postcards. After all, you can congratulate your relatives not only on your birthday or New Year, but also on the onset of autumn, with mushroom rain, and the beginning of your vacation. It is necessary to teach kids to see the beautiful in everything and give joy to loved ones even when there is no apparent reason for this.
Master class "How to draw an umbrella for a stencil"
Even those who have no artistic talent will cope with this work. You just need to use a master class showing how to draw an umbrella with a pencil in stages.
First, a semi-oval is drawn on a sheet.
Then from below the ends of the arc are connected. They also use the semi-arc, but apply it with a thin line. This is an additional construction, which is then removed.
From the middle of the upper arc, slightly concave and curved arcs are drawn down to the bottom line.
Additional construction is removed using an eraser.
Seamlessly connect the ends of arcs dropped from the middle of the upper line. For this, concave arcs are again used.
In the upper part, in the center, they erase a small area. Here again, you need to draw a small concave arc.
Now make out the "little girl" of the umbrella. It can be of any form, at the request of the master.
From the bottom draw two vertical parallel straight lines for the handle.
Next, they draw the pen itself. It can be curved or have the shape of a rectangle, a trapezoid.
It remains only to colorize the image. The drawing is ready!
Master class in drawing an umbrella with a simple pencil with hatching
This way of depicting objects is already more complicated. Therefore, they are advised to use those who are already familiar with the basics of drawing with a simple pencil. Applying shade is usually studied at middle school age. But a master class can also help here. He will show you how to draw an umbrella in stages, and then properly hatch it.
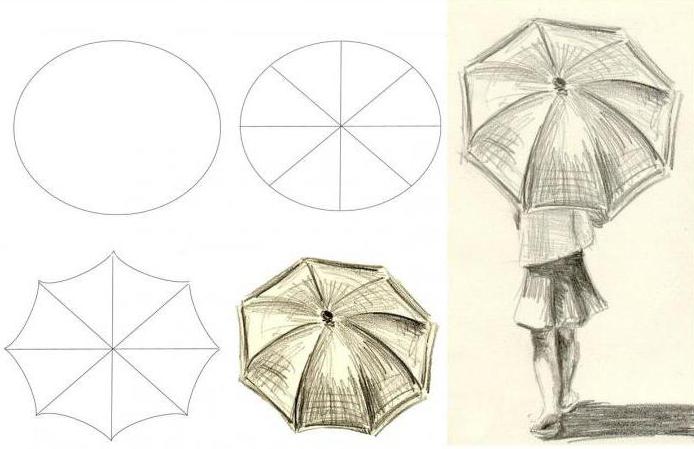
- First draw an oval. A thin line should be used here, as it is subsequently removed. This is an additional construction.
- Then the oval is divided into straight line segments into eight parts. The straight lines should intersect in the center of the oval.
- An additional construction in the form of an oval is removed with an eraser.
- Between the ends of the segments have arcs, connecting them together.
- Now comes the most difficult moment. You need to beautifully shade the umbrella to give volume to the image.
- You can start working on the drawing from the upper segments of the object. For work, they use a well-honed soft simple pencil. The strokes are applied not with the tip, but with the stylus plane. To do this, the pencil should be kept at the smallest angle to the sheet.
- Five parts are selected first, starting from the top right corner segment. They are shaded in the inner corners to the middle. You need to keep the direction of the lines of the strokes. They should go from the corners to the middle of the segment.
- The third segment can be made completely shaded. But the hatch tone should not be intense.
- In the fourth and fifth segments, it is necessary to highlight a more pronounced bulge, an arc that depicts an internal wire spacer. In these places, the shading is more intense, almost black.
- In the fifth segment, a darker shade is already on the second ray of the angle. But more intense coloring is only in its lower part.
- The sixth segment is shaded only at the bottom.
- In the seventh, you need to paint a little less from the bottom and grab a part of the spacer arc on the left.
- The eighth segment has a dark part only at the upper ray of the angle.
- After applying the hatching, you should additionally highlight the arc of the umbrella.
- If desired, you can finish the girl hiding under an umbrella, or two lovers, gently hugging each other.

Anyone who sets this goal and will take classes seriously can achieve success and learn how to draw an umbrella.