Russian dumplings, Ukrainian dumplings, Italian ravioli ... In which kitchen there is no dish, which is a bag of pastry with minced meat inside? In the countries of Transcaucasia this dish is called “khinkali”. It is clear that dishes differ not only in name. Each of them has its own regional characteristics. So they are also present in khinkali. This feature lies in the fact that the broth must also be contained inside the bag of dough. And the meat (in the traditional recipe is lamb) is cut with a dagger into the smallest pieces and mixed with herbs.
The art of sculpting khinkali is the skill to create many folds. It should really be a bag, not a bag (dumpling). Visually authentic khinkali looks as if tied with a thread. Given this specificity, the test requirements are special. After all, it must be very elastic and at the same time strong so that the broth does not leak ahead of time. In this article we will look at how to make dough for khinkali. Modeling Caucasian dumplings is a whole art, and we will try to master it.
Classics and allowed innovations
Previously, the rules for preparing this dish were strict. For the filling used the meat of mountain goats or domestic sheep. The minced meat was cut with a dagger. Only salt, black pepper, wild dill and cilantro were added there. Khinkali dough also did not require many ingredients: only flour, water and salt. Sometimes an egg was added to it. But kneading the dough was very time-consuming. But the effort spent paid off handsomely. The dough came out soft and elastic, well kept tight during cooking. Khinkali sizes varied, depending on regional characteristics. Somewhere they were the size of a walnut, and sometimes one "dumpling" occupied the whole plate. But what made khinkali all related was the shape of a bag with numerous folds. What is permissible for a modern chef who wants to taste the delicacies of Caucasian cuisine? Firstly, expensive mutton can be replaced with beef or pork. Stuffing is allowed to pass through a meat grinder. But the khinkali dough, if you want to get a bag of broth, must be prepared according to a traditional recipe.
Kneading
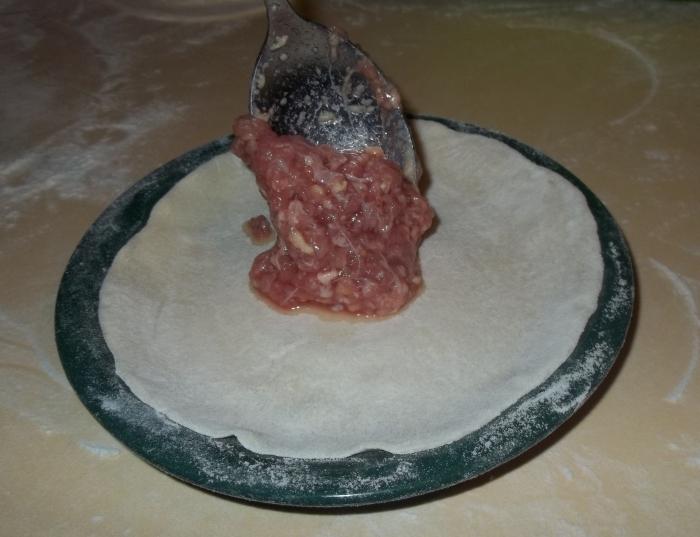
Sift three glasses of flour into a deep bowl. Pour a few pinches of salt. We make a recess on the apex with our finger, and pour a glass of water into this crater . It should be ice - this is the requirement. Stir with a fork. When the mass begins to more or less resemble a dough, transfer it to a table sprinkled with flour and knead for a long time. It should turn out elastic and stop sticking to the fingers. When you have achieved this, cover the khinkali dough with a napkin and leave it for thirty minutes. While doing the filling. In 500 grams of minced meat, add two onions passed through a meat grinder and pour a glass of ice water or broth. The filling absorbs liquid well. She will come out moist and a little viscous, but dense.
Another Khinkali Dough Recipe
Sift the flour (half of the amount indicated in the above method) with a slide, mix with salt. Pour a glass of broth. In a separate bowl, shake the egg with a fork and also add to the “crater”. Having washed, we shift to the table, sprinkled with flour. The dough will stick to your hands first. Therefore, the palms should also be immersed in flour from time to time. After the first, longest, kneading, you need to give the dough to rest for half an hour. During this time, you can cook the filling. After that, you need to knead the khinkali dough, add the remaining half of the flour and knead for another ten minutes or a quarter of an hour. It is necessary to start modeling bags immediately.
Recipe number 3
Some families add olive oil to the dough. So it turns out even more elastic. And the egg makes the dough strong, so that the broth from the middle of the khinkali will not pour out during cooking. We start the kneading as in the previous recipe. Sift in a bowl and a half cup of flour. This is half the standard required. Add a teaspoon of salt. Mix and form a volcano with a crater. Pour two or three soup spoons of olive oil into it. We also drive one chicken egg. Slowly knead with one hand, and the second we begin to pour cold water. It can be done a little differently. Dissolve the salt in advance in water and let it cool. But this is an insignificant difference. When you get a homogeneous and soft mass, cover it with a towel and leave it to rest for half an hour. After that, as the recipe for Khinkali No. 2 recipe suggests, add the remaining flour and knead for ten minutes. But, unlike the previous method, we do not start sculpting. Again, cover the gingerbread man with a towel for half an hour. After this time, crush the dough again. If it still sticks to your hands, add flour.
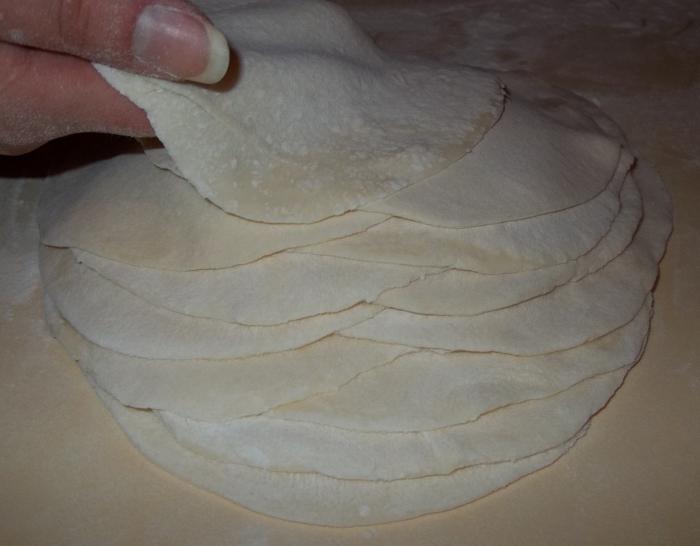
Rolling dough
Real housewives, when they make homemade khinkali, roll out the dough for each bag separately. There are two ways to do this. The first is to simply pluck pieces of dough the size of a large nut from a bun. This often leads to khinkali of various sizes. You can resort to the second method: to form a sausage from the whole dough, cut it into slices one and a half centimeters thick. Well, the easiest way is the way we usually make dumplings or dumplings. We roll out the dough with one thin layer and use the form to cut out round cakes. The only difference is that the pattern here is not a glass or even a glass, but a saucer. Pellets should be large - about 10-12 centimeters in diameter (like a CD) - and thin, not more than two millimeters.
Bagging
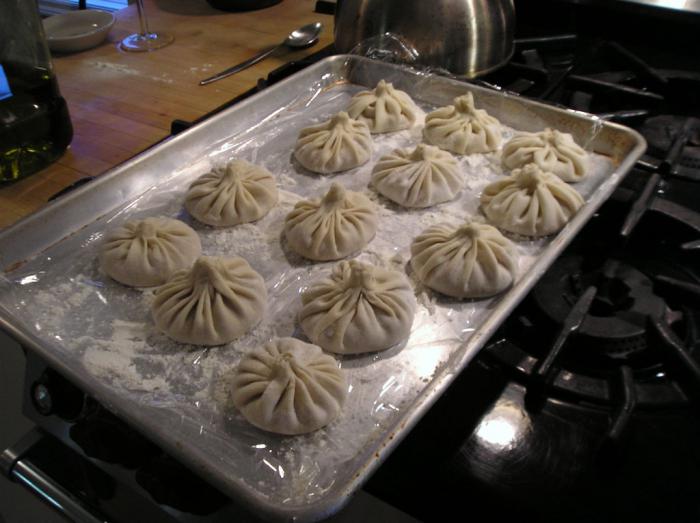
The canon requires the mistress that each khinkali should have at least 20 folds. And some craftswomen can bring their number to 36! How to sculpt khinkali? A step-by-step recipe advises first to put a tablespoon of minced meat in the middle of the cake. Then with two fingers we take two opposite ends of the circle and connect them. We give the khinkali a little hang so that the dough is pulled. Now remember how in childhood we folded an accordion from a sheet of paper. There is the same principle. We fold the folds to one another at the tail, moving the cake in a circle. Here you need a skill. Most likely, you spoil the first ten khinkali, but over time the skill will come. Some culinary specialists try to form blanks in a different way. They simply connect the edges of the cake together and twist the bag so that it wraps around like a candy wrapper around a candy. This method is easy, but there is one but. In a pot of boiling water, the pouch can also be quickly untied, as it was screwed up.
Cooking
Cooking khinkali is no different. They are cooked in the same way as ordinary dumplings. The only thing is not to throw all products at once into boiling salted water. From contact with each other, they can stick together, and the dough can break. Lower them with a slotted spoon one at a time. After the bags pop up, they need to boil for about six minutes. We spread them on a large dish, sprinkle with coarse black pepper. Separately, you can serve tkemali, satsebel or cornel sauce. And a bottle of khvanchkara would not hurt.
How to eat khinkali
This dish is taken only by hand. From the puncture with a fork, the broth from the bag will drain onto the plate, and cooking khinkali is a rather laborious process to allow such barbarism. Indeed, the numerous folds that the hostess painstakingly sculpted are the guarantee that the dough will not break. Khinkali is eaten like that. They take it by the tail, dip it in the sauce (if any) and bite. Then a delicious, scorching broth will go straight into your mouth. Well, then eat the rest. Ponytails can be folded onto the edge of the plate.